Zucchini Kottu


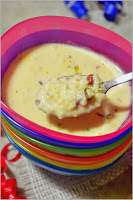
Today is the final day in Journey through Tamil Cuisine in A-Z series in mega BM and the letter is Z.Usually I end up the mega marathon with a sweet note,as Z is one of the toughest letter to find a Tamil recipe I made a simple kootu with Zucchini.Since zucchini belongs to the squash family,I made the kootu the way we make soraikkai/squash.
As zucchini cooks very fast,it takes few minutes to cook.Here I used the cooked channa dhal,but any type of dhal can be used.
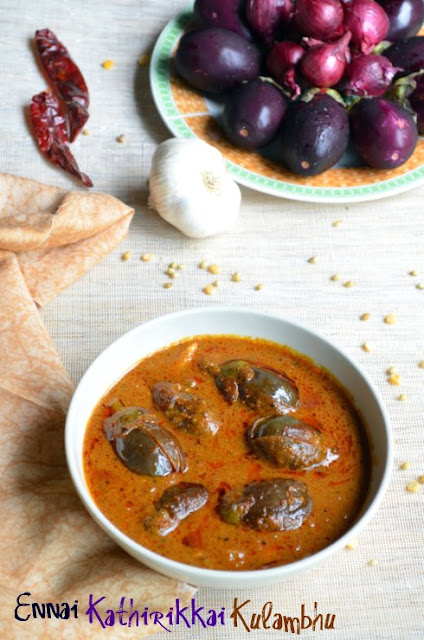
Kootu can be mixed along with rice as well as can be an accompaniment for a spicy and tangy kuzhambu varieties.I paired up with the ennai kathirikkai kuzhambu,lets move on to the recipe...........


                                                                                 Zucchini Kootu


   Basic Information

   Preparation time ~ 10 minutes
   Cooking time ~ 20 minutes
   Serves ~ 3


  Ingredients


Ingredient
Quantity
Zucchini
2 (chopped)
Channa dhal/kadala paruppu
3 tbs
Turmeric powder/manjal podi
a pinch
Salt
3/4 tsp
Oil
1 tsp
Curry leaves/karivepillai few leaves


   To grind to a fine paste

Ingredient
Quantity
Dried red chilly/varmilagai
1
Green chilly/Pachamilagai
Coconut(grated)
2 tbs
Cumin seeds/jeergam
1 tsp

   For the tempering
  
Ingredient
Quantity
Mustard seeds/kadugu
1/2 tsp
Urad dhal/uluthamparuppu
1 tsp
Asafoetida/perungayam
a pinch
Dried red chilly/varamilagai
1(broken)


  Method

  • Cook the channa dhal in a pressure cooker for 2-3 whistles.It should not turn mushy but needs to cook until soft.Grind the given ingredients to a fine paste and keep it aside.
  • Peel the skin if needed for the zucchini and chop it.Keep a pan on the stove and add the chopped zucchini and to this add 1/4 cup of water.Add the salt and turmeric powder to it.Cook it covered for 3 - 4 minutes or until 3/4th cooked.Now add the cooked channa dhal and mix it well.
  • Add the ground paste and let it cook for 3 minutes or till the raw smell disappears.Do the tempering in a pan and add it to the kootu and mix it well.Put off the flame.
  • Serve it with white rice and kuzhambu


    • As zucchini cooks very fast it may turn mushy,so keep an eye while cooking.
    • Instead green chilly,2 red chillies can be used in the coconut paste.

    Enjoy............................


    Check out the Blogging Marathon page for the other Blogging Marathoners doing BM# 63


    Yennai Kathirikkai Kulzhambhu/Ennai Kathirikkai Kulambhu - No Onion & Garlic Version


    For letter Y under the theme journey through Tamil cuisine,in Blogging Marathon,sharing you a finger licking kulambhu/kuzhambu.
    Yennai kathirikkai kulambhu is an authentic preparation of Tamilnadu and lot of variants for this recipe.
    Yennai Kathirikai kulambhu is a tamarind based gravy in which eggplant is stuffed and used.This is a slightly spicy gravy goes very well with rice.
    I have already shared my mom's version of ennai kathirikkai kulambhu but this version is with no onion and garlic.Off to the recipe...........


                           Yennai Kathirikkai Kuzhambu                 


       Basic Information

       Preparation time ~ 15 minutes
       Cooking time ~ 25 minutes
       Serves ~ 3


      Ingredients

      For the gravy/kuzhambu

      
    Ingredient
    Quantity
    Brinjal/eggplant/kathirikkai
    5-6
    Tamarind/puli
    a big gooseberry size
    Turmeric powder/manjal podi
    1/4 tsp
    Salt
    1 tsp
    Oil
    1.5 tbs
    Curry leaves/karivepillai few leaves


       To roast and grind

    Ingredient
    Quantity
    Dried red chilly/varmilagai
    5-6
    Coriander seeds/dhaniya
    1.5 tbs
    Coconut(grated)
    3 tbs
    Chann dhal/kadala paruppu
    1 tbs

       For the tempering

      
    Ingredient
    Quantity
    Mustard seeds/kadugu
    1 tsp
    Fenugreek seeds/vendayam
    1/4 tsp
    Asafoetida/perungayam
    a pinch
    Dried red chilly/varamilagai
    1(broken)


      Method
    • Dry roast the given ingredients except coconut in a pan to a golden color.After the spices turned golden add in the grated coconut and fry it.
    • After cooling,coarsely powder it in a blender.Soak the tamarind in water and extract the juice. Add turmeric powder and keep it aside..
    • Remove the stalk in the eggplant and make a '+' mark on the eggplant.Stuff some ground spice powder for the egg pants and arrange it on  plate.
    • Heat a pan with oil and crackle the mustard seeds and fenugreek seeds.Add the asafoetida  and red chilly,curry leaves.Add the stuffed eggplant and fry it for 3-4 minutes or until the eggplants are half cooked.Add the remaining spice powder and salt.Give it a mix.
    • Add the tamarind water along with a cup of water.Let it cook covered in a medium flame for 10 minutes.Once the eggplants are tender,remove the lid and let it simmer for 2-3 minutes.Add some curry leaves and put off the flame.
    • Serve it with white rice and some veggie poriyal along with pappad.


      • Once the kulambhu becomes cool down it gets thick,so adjust the consistency according to preference.
      • Use small and same size eggplants to get cook evenly.
      • Using the sesame oil gives a nice flavor and taste to the kulambhu.


      Enjoy..............


      Check out the Blogging Marathon page for the other Blogging Marathoners doing BM# 63


      Xtra Spicy and Xtremely Easy to make Poondu Chutney/Garlic Chutney


      We are almost in the end of the A-Z series in journey through Cuisine in mega marathon and today is letter X.As there is no ingredient or dish starts with X,need to use English word.So decided to make this (e)xtra spicy and extremely easy to make garlic chutney.
      This chutney is often made when there is no accompaniment for the left over idlys.This chutney tastes so good with chutney and end up in eating (e)xtra few idlys.Usually this chutney is ground in a stone mortar(grinder) and it will be in a thick consistency.But with the mixie it is bit hard to get a thicker consistency.
      As this is a spicy chutney it needs to be topped up with generous amount of sesame oil.Here I used little amount of tomato.But addition of tomato is purely optional.My mom used to add tomato,as it subtle the spiciness.Off to the recipe.....


                                                      Xtra Spicy and Xtremely Easy to Make Poondu Chutney


         Basic Information

         Preparation time ~ 10 minutes
         Cooking time ~ no cooking time
         Serves ~ 4


        Ingredients


      Ingredient
      Quantity
      Dried Red chilly/varamilagai
      6-8
      Garlic/poondu
      3-4 small cloves
      Tamarind/puli
      small gooseberry size
      Toamto
      1/2 (small size)
      Salt
      1/2 tsp
      Sesame oil/nalla ennai
      1 tbs

        Method 
      • Take the red chillies,tamarind and salt in a blender jar.Powder it for a minute.To this add a tbs of water and grind it to a smooth paste.Now add the garlic and tomato to it and grind it..
      • Transfer the chutney to a bowl.Now heat a small with sesame oil and once it becomes hot,pour it on the chutney.Mix it well and serve.
      • Serve it with idly.


        Enjoy...............


        Check out the Blogging Marathon page for the other Blogging Marathoners doing BM# 63


        Wheat Halwa /Easy Wheat Halwa Recipe


        There is no dish or ingredient start with W in Tamil cuisine and need to use some clause or English word.When I was listing the recipes for the theme,just marked wheat or wheat flour for the letter W.
        After finalizing wheat or wheat flour for W, I was confused about a particular recipe.
        My search for the recipe started in the last moment and looking at internet and some of my cook books.While looking at my one of my old recipe booklet this recipe caught my attention.But the the measurements I noted is for large scale.I scaled down the measurement for a cup and also referred here to get a clear idea.

        Coming to the recipe its an easy and short cut method to make the wheat halwa.The method of making wheat halwa is bit lengthy as the wheat berries are soaked,ground then extracted.But using wheat flour makes the work easy and taste also almost close to original one.
        I have seen wheat halwa is made in large quantities for wedding most the cooks in our hometown follows this method.

        My hometown is famous for ashoka halwa and it appears in the wedding menu mostly for the breakfast.As the South Indian wedding menu needs to be so elaborate and the menu should not repeat and of course its 4 time meals for 2-3 days.Also there is a ritual of serving sweet,karam(savory),kaapi(coffee) for the snack time in the evening in most of the weddings.
        For that occasion this wheat halwa is served along with either bajji or bonda along with coffee.The halwa is sliced to a perfect 2 inch square,in which the ghee drips and  melt in mouth.This combo is so popular especially in Tanjore/Thanjavur district weddings. Though the process of making halwa needs lot of arm power its worth to try once in a while.Lets move on to the recipe....


                                                                    Wheat Halwa/Easy Wheat Halwa


           Basic Information

           Preparation time ~ 10 minutes
           Soaking time ~ 2 hours
           Cooking time ~ 45 -50 minutes
           Serves ~ 5-6(generously)


          Ingredients


        Ingredient
        Quantity
        Wheat flour/gothumai maavu
        1 cup
        Sugar/sakkari
        2-2.25 cups
        Ghee/nei
        3/4 - 1cup
        Water
        4-5 cups
        Cashews/munidri
        3 tbs(broken)
        Cardamom powder/ellakai podi
        1/2 tsp
        Orange or red food color
        a pinch

          Method 
        • In a bowl take the wheat flour and mix it well with water like a chappathi dough.To this add around 4 cups of water and let it rest for 1-2 hours.
        • After 2 hours  using the hand mix the dough well and pass it through a strainer.To the extracte liquid add around one cup of water and strain it for one more time.Keep it aside.
        • Now in a tsp of ghee fry the cashews and remove it, set it aside.Add the extracted liquid in the pan and stirring in a medium flame.After 12-15 minutes of stirring the liquid will be in a porridge like consistency.Add the food colur and mix it well. 
        • Keep stirring it for another 2-3 minutes or the raw smell goes off.Now add the sugar and mix it vigorously.Now slowly add a tbs of ghee in intervals and continue stirring.
        .
        • After 10-15 minutes of stirring the mixture turns thick and will be glossy.Now add the fried cashews and cardamom powder.
        • Mix it well and stir it till the halwa leaves the side of the pan.Transfer it to a pan and slice it after cooling or serve it in bowls.
        • Serve it warm or cold.


        • The entire cooking needs to be done in a medium flame.Otherwise the halwa turned out so lumpy.
        • Addition of sugar can be increased upto 2.25 cups to get a sweeter version.
        • For reheating,keep the halwa in a bowl of boiling water or MW it for 10-15 seconds..
        • Continuous stirring is so important to get a nice consistency halwa.


        Enjoy..............


        Check out the Blogging Marathon page for the other Blogging Marathoners doing BM# 63


        Vadacurry/Vadakari/Vada Curry - Saidapete Special


        Today is letter V under our mega marathon themed Journey through Tamil cuisines and its a popular accompaniment,vadacurry.
        Vadcurry is an accompaniment served  for idly,dosa and idiyappam.Mini masala vadas are dunked in a creamy rich onion,tomato based gravy.
        As this curry was introduced in a hotel at Saidapete in Chennai and gets popular.Since then its called as Saidepete vadacurry/vadakari.
        Low fat steaming version of vadas can be made and add in the gray.But in hotels deep fried vadas are crumbled and used.So I followed the recipe and deep fried the vadas,used it.Off to the recipe........


                                                                                      Vadacurry/Vadakari/Vada Curry


           Basic Information

           Preparation time ~ 15 minutes
           Cooking time ~ 35-40 minutes
           Serves ~ 3-4


          Ingredients

         For the vadas

        Ingredient
        Quantity
        Channa dhal/kadala paruppu
        1/2 cup
        Ginger/inji
        1/2 inch piece
        Garlic/poondu
        2 cloves
        Red chilly /varamilagai
        Fennel seeds/sombu
        1 tsp
        Salt
        1/2 tsp
        Oil
        to fry

         For the gravy
            
        Ingredient
        Quantity
        Onion/ vengayam(finely chopped)
        1 (medium size)
        Ginger&garlic paste
        1 tbs
        Tomato(pureed)
        2 (medium size)
        Red chilly powder/milagai podi
        1 tsp
        Coriander powder/dhaniya podi
        2 tsp
        Turmeric powder/manjal podi
        1/4 tsp
        Green chilly/pachamilagi
        3 (slit lengthy)
        Thick coconut milk
        1/2 cup
        Curry leaves/karivepillai
        few leaves
        Coriander leaves
        1 tbs(finely chopped)
        Salt
        1.25 tsp
        Oil
        1 tbs

           For the tempering
          
        Ingredient
        Quantity
        Fennel seeds/sombhu
        1/4 tsp
        Cloves/lavangam
        3-4
        Cinnamon/pattai
        1 inch
        Bay leaf
        1

          Method
        •  Soak the channa dhal in water for couple of hours,after soaking drain the water completely.Take the soaked channa dhal,fennel seeds,ginger,garlic,red chilly and salt.Grind it to a coarse paste without adding water.Transfer it to a bowl.Heat oil in a pan and once it becomes hot take a handful of batter. Pinch out a small gooseberry size batter and drop it in the oil.Fry it till it becomes nice and golden.
        • Remove it from the oil and drain it on a paper towel.Crumble half of the vadas and keep it aside.Heat 1 tbs of oil in a pan to make the gravy and do the tempering with the given ingredients.Add the onion,green chilly and curry leaves along with a pinch of salt.
        • Saute it till transparent,add in the ginger&garlic paste and fry it util the raw smell disappears..Add in the pureed tomato and cook it until mushy.Add in all the spice powders and salt,give it a mix.
        • Let it cook for a minute.Add around 1.5 cups of water and cook it for 5 minutes,let it simmer for another 2 minutes.At this stage add the coconut milk.
        • Let it boil for 2 minutes or raw smell goes off.Now add the crumbled vadas and vadas to the gravy.Let it cook for 2-3 minutes in a medium flame.Add in the chopped coriander leaves and put off the flame.
        • Serve it with idly or dosa.


          • After adding the vadas to the gravy,it tends to absorb more gravy so adjust the consistency of the gravy while cooking.
          • For steaming the vadas,take the prepared batter in a idly plate and steam for 5-7 minutes.
          • Instead of coconut milk,coconut paste can also be used.

          Enjoy..............


          Check out the Blogging Marathon page for the other Blogging Marathoners doing BM# 63


          Related Posts Plugin for WordPress, Blogger...

          Share

          Twitter Delicious Facebook Digg Stumbleupon Favorites More